Showing posts with label Hexagons. Show all posts

Tuesday, July 10, 2012

30 Years - Hundreds of Hexagons

Thirty years ago we moved from a four bedroom house to a one bedroom apartment.
I sorted through my fabric scraps - cutting hexagons to make a
Grandmother's Flower Garden quilt with the English Paper Piecing method.

I ended up with fewer scraps.  And a lot of work.

But this week, I finished sewing all the hexagons together.
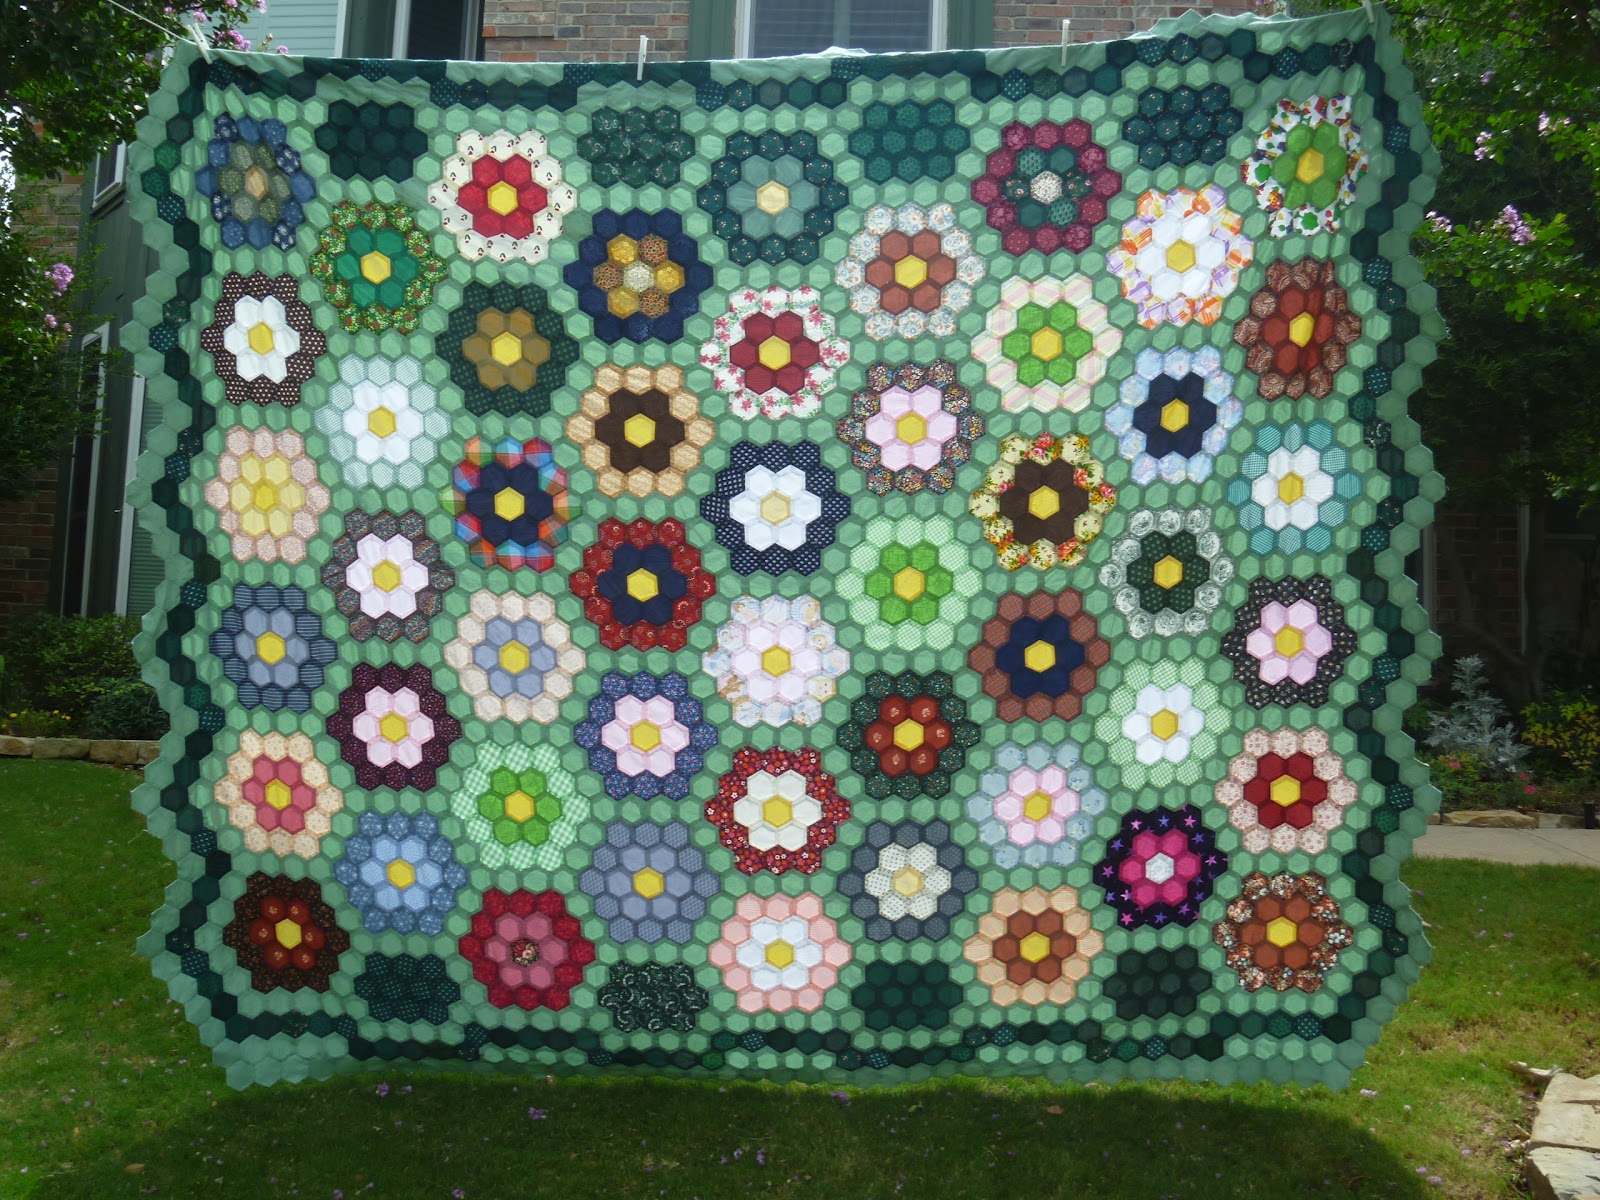

The DEFINITION: "Scrap Quilt"
is seen in this quilt. 

I used all kinds of fabrics - because they held so many memories
and, well, that was what was in my scrap bag!


This green flower is The First of the flowers that I sewed. 
You can see the tiny stitches - and double thread on the solid green.
By the time I was stitching the last of the calicos on this flower,
 I realized I did not need to double the thread.
(I was riding in a 70's VW bus with my In-Laws, 
on the way to meet my husband's Grandmother)
(What a great memory!)

I have decided that the most important thing to me about my hobby of quilting is
THE JOURNEY 
THE PROCESS
THE 'DOING'

I even enjoying THINKING about what I might make in the future.  And I like to touch fabric and look at pretty colors.

And that is what I did with this quilt for 30 years.


I left the last row with the paper still basted in.

I had always said that I would never let a machine touch this quilt - after all the handwork I've invested.
But, now that I have finished, I mused out-loud to my daughters about quilting some of this with my machine, and some by hand.

They both immediately protested.  And I agree.  It deserves to be hand quilted.


After I had finished all the flowers, I did not like the top and bottom and I did not want to put half-flowers there.  So I created the green 'leaves' to kind of even those edges.  Then I decided a dark green frame would be a sweet accent.  When I went to sew on the last row of light green - the hexagons were missing.  You can read about THAT fiasco here.

But now I am done withe the English Paper Piecing.
I am done with Hexagons. . . at least done with THESE hexagons!
And Now I just have to hand quilt this baby.


My goal: finish hand quilting it by July 4, 2013.  
(This picture is too big for the blog-post, but it just makes me happy!)
CathyH

Sunday, October 9, 2011

My Grandmother's Flower Garden

I started English Paper Piecing a Grandmother's Flower Garden in 1982. Yes. 29 years ago, now. I used scraps. Scraps from clothes I wore in Jr. High. Remember those mini-dresses made out of . . . I don't know what to call it. It had interesting texture and thickness, wild, bright flowers. Like this:


Scraps from BEFORE Jr. High - Remember Dotted Swiss?
And Seersucker?


And scraps from clothes I made in High School. Scraps from one of my favorite blouses - it looked Victorian. If you look closely, however, you will see Mickey Mouse and Minnie Mouse in SOME of the medallions. I called it my "Mickey Mouse Blouse". I fussy cut these hexagons before I know the words "fussy cut".

I added some dark green collections of hexagons on the left and right side to make the edges less scalloped. Then I added a row of light green and a row of dark green. Don't be too impressed yet, it HAS been a UFO for 29 years now!!!


The last row was all I needed. I cut 172 light green hexagons during vacation in 2007.

And lost them.

Since then I just kept hoping they would show up somewhere. Alas, they have not appeared. Last night I gave up. While we watched the Texas Rangers beat the Detroit Tigers (and during the two rain delays), I pulled my scraps of light green and cut 172 more hexagons.

Now I have handwork again. Only 172 hexagons to go.

Go Rangers!
CathyH

Sunday, October 2, 2011

FINISH!!

We drove to Austin Friday, and back Saturday - and had enough time to FINISH the padded hexagon quilt!!!


The prints are on the"right side" of the quilt. 
The solid-like greens run in between to make a kid of river separating the colors. 
 On the "back side" of the quilt the solid side of the flowers show.


I have never seen another quilt like this - although I have searched the internet. I am fairly certain my Mom started the Hexagons in a quilt class in California. I do not know what the intended outcome was!! Please leave a comment if you have seen projects with "padded hexagons" before.

Mom HAD started putting them together randomly, print sides up. (OH! I wish I had taken a picture of that before I re-structured the quilt). After deciding to sew them together into flowers, I fiddled with them and fiddled with them to find a pleasing arrangement. To see some of the earlier steps of this quilt check here and here.

I realize that I really DO like hexagons - and now I may go cut out the dozens of green hexagons I need to finish my Grandmother's Flower Garden that I started in 1982. I only need one row of light green to go all around the completed quilt top to frame it. I HAD cut them out in 2007 while we were on vacation. . . cut them out BY HAND. But I lost them. Yes. Lost them. I am pretty sure they are NOT in my stash - but I have no idea where they are.

Let me relish this finish once more with a close up of a part of the back:
(I FINISHED something!!!)
But I have other projects!


CathyH

Saturday, September 17, 2011

Green Hexagons DONE

I completed the Green Hexagons necessary to connect all the flowers!!!
Here are the solid sides


and here are the prints.


My artistic advisors (daughter and possibly my son) will help me choose where to place these on the quilt, and I will soon finish. YESSSSSS!

CathyH


Friday, September 9, 2011

Decisions. Deccisions.


The fun began when I tried to decide how to arrange all the padded hexagons. The random approach was not pleasing to me, so I actually un-sewed about 20 of the hexagons. I decided to sew them into 7 piece flowers and then started laying them on the floor.

I placed black hexagons periodically amongst the prints, with the solid side up. I was hoping it would separate the cacophony of color and print. The back side of the quilt is going to look good, because there is some cohesion. I thought about this plan. I decided it was NOT going to work. there is just too much print on the front of this quilt.

I arranged the flowers in color-coordinated rows and used black to separate the rows.
(Sorry the picture is so dark)

I decided to abandon the black blocks but keep the flowers in color-coordinated rows. I came up with this layout.

But I couldn't figure out what to use to join the rows. Finally I took apart the green flowers (where are the green flowers in real life, anyway?) and plan to use them to join the rows. I am not willing to make enough greens to completely surround each flower but thought this vertical color rows might work with a few greens to separate the rows.

I also sketched this quilt about three times, and, in the end, the sewing happened differently than any sketch!! Here is the current progress on this quilt: The front on the left, and the back on the right. There will be three or four more rows.


I am currently creating a few more green hexagons to fill in the holes and to smooth the edges.


On the back I have bright pink paper tags with numbers. That helps me know where to attach the next rows of flowers. The front is interestingly busy. The back, well, is simpler. I'm excited to get near the end of this project.

CathyH

Thursday, September 8, 2011

Flowers from Scraps


Reminiscent of Grandmother's Flower Garden, the traditional hexagon quilt, I decided to group these hundreds of padded hexagons into flowers to make some kind of orderly sense out of every fabric you can imagine.

I mentioned that all (most of) the backs of the hexagons are a tone-on-tone or solid-like fabric. So I grouped the hexagons into sets of seven to make flowers. I arrange the prints in a satisfying arrangement and then turn them over to the backs to make sure the back looks good too (and tried to avoid two pieces of the same fabric being right next to each other).

With the English Paper Piecing hexagons, I just used a whip stitch to put them together. I tried that with these. I did not like the look of the whip stitch - as it will be exposed on the back of the quilt. So I chose to use a hidden hem stitch much like what I use when I stitched the frame around the hexagon. This is the same stitch I use when I hand bind a quilt. I go through the fold of the top hexagon and out about a scant 1.4" later, grabbing a couple threads from the lower hexagon. Then stitch into the fold of the top hexagon right where the needle came out of the bottom hexagon. That way just a little, tiny stitch shows Maybe you can see it in this picture:
Cathy H

Wednesday, September 7, 2011

Pad a Hexagon

I inherited quite a few unfinished projects from my Mom. The padded hexagons provide great handwork that I can take with me just about anywhere. She had completed over 300 of the individual hexies. At Bee yesterday, someone said they would be cute as coasters. I'd have Christmas gifts made for this year already. More than 300 Christmas gifts!!! Mom always intended them to be put together into a small lap quilt, so that is how I am headed.

Mom made all her padded hexagons with a tone-on-tone/solid effect on the back (and thus the frame) and then some coordinating print on the front. Here is a picture of the size for each. (Large hexagon has 3" sides, small hexagon has 2" sides) I teach High School Math - and LOVE geometry, so I could have created these hexagons with just a ruler and a compass. But I already had hundreds of them cut and sewn - so I just used one of those as the pattern.

After you cut a large background/frame hexagon, a smaller print hexagon and a small hexagon out of batting, you place the background fabric face down, center the batting and then put the print on top of the batting.


Then you start to prepare the frame so you can sew it. Fold the background fabric so its edges meet the small hexagon's edges, then fold it once more so it overlaps onto the print about 1/4 inch. I pin each side as I make those two folds, folding one side, rotate, fold the adjacent side (move around counterclockwise) until all six sides are pinned.


Next I begin to use a hidden hem stitch, well maybe you would call it an applique stitch, to secure the frame all the way around. I keep my stitches so they are about 1/4 inch from each other, being sure to stitch at each corner to make it stay and look sharp.

Then you make hundreds of these. I have made a couple dozen of them so that I have the correct selection of colors for the layout I finally chose. They go together quickly, they are extremely portable, and they give you finished results in a short period of time (if you like coasters!).

How to put the individual hexagons together into flowers - next time!
CathyH


Sunday, September 4, 2011

Padded Hexagons

I have this amazing collection of Padded Hexagons. My Mom started this project sometime before 2005. I am attempting to complete the project.


I think the idea was for it to be totally scrappy. . . random colors all over the place. Mom had even begun to sew the Hexies together however they came out of her box.
My life had enough disorder - so I started sewing them together into 7-hex flowers of similar colors.


I'll tell about the size, process, and show the ideas for layout next time.

Good night!
CathyH