Showing posts with label Stash. Show all posts

Thursday, May 23, 2013

Rainbow Snowballs

RACING!!!!!
To meet the deadline!!!!!
To post a quilt to the Rainbow 
(Red Orange Yellow Green Blue Indigo Violet) 
category of the Blogger's Quilt Fest!!!

AmysCreativeSide.com

I  JUST finished this quilt: Rainbow Snowballs.


Cut out in 2003.
Cut totally from scraps.
Machine Pieced in 2006.
Hand quilted.
Finished May 23, 2013 11:30 pm CST.


The back is a rain-bow tie-dyed fabric.... 


Made for our second daughter - who loves rainbows.
Who just started Physician Assistant's School.
Who probably needs a pretty quilt with her at school.


View all the other ROYGBIV quilts
on the Blogger's Quilt Festival.

AND 

Vote for your favorite.

Maybe it will be this one!!!


Thanks for visiting!!
Come back later - I might have time to tell some more about this quilt!
I might, also, have pictures of the quilt in day light.
Remember - I just barely finished this in time to enter the Festival.
And . . . it's  a FINISH!!
CathyH

Friday, September 7, 2012

I Love Red and White!!

I am FINISHED!!!!

Last December I received 13 Red and White blocks from our Seams Like Sisters Bee.
They are BEAUTIFUL!!
They are all in a quilt and
In a FINISHED quilt.


This quilt was so much fun to make!!   And it was a great stash-buster.  I used scraps of red prints that I had in my stash and scraps of batting and some white-on-white yardage that I had.  I even had red thread.  The reds I had were so similar that you almost cannot tell that there are 5 or 6 different red prints used to surround the pieced blocks I received.

An earlier post described how I made the quarter-square-triangle blocks that are in between the pieced blocks.

 I used a Quilt-as-you-go method.  I even tried some free-motion quilting on three of the blocks.  The triangles just called for straight-line quilting, though.


Maybe the most amazing thing about the quilt is the back.  I added a white Ohio Star amidst the variety of red fabrics.  THEN, when I hung in to take a photo... well ... you can see faintly see the blocks from the front of the quilt.  I LOVE this quilt!!!


I look forward to using this quilt at
Christmas.
And Valentine's Day.
And Memorial Day.
And the Fourth of July.
And Labor Day.
And anytime I want to feel loved!


Thanks, so much to Kelly, Holly, Linda, Renee, Sandy, Susan, Judy, Carla, Diane, Kathi, Priscilla, and Shirley.  You ladies just Seem Like Sisters to me!!

CathyH

Saturday, September 1, 2012

Decorated Bags

I should have thought of this sooner: make smaller quilts and they can be finished more quickly!!  I decorated some fabric bags with small quilts that serve as pockets.  These were gifts for ladies who helped with the Psalms study for the ladies at our church.


These were especially fun using little scraps from my scrap boxes.


Yellow and orange seemed appropriate when reflecting on Psalm 119:105 
"Your word is a lamp to my feet and a light to my path"


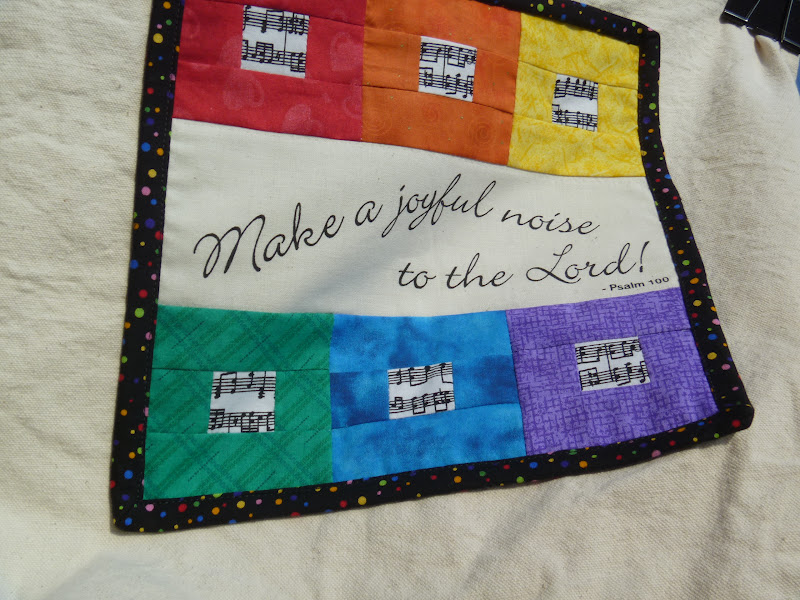
A rainbow of colors and music notes helped frame the call to
"Make a joyful noise to the Lord"


And - well - I had a collection of bonus triangles that fit around 
"Let the beauty of the Lord our God be upon us"


These bonus triangles came from a Round Robin that my two daughters and I did one summer at the local library's Quilt Chat.  They were left over from this second border made by my daughter.  In fact, there were EXACTLY enough half-square-triangles to fit around the Psalm on the bag!!


Here is the Round Robin quilt revealed at the end of the summer with two other borders added:


I CAN finish things!!
I should just think on a smaller scale!

I'm linking up with the Small Blog Meet at Lilly's Quilts.
Check out some OTHER people who make pretty things!

Lily's Quilts
CathyH

Sunday, August 19, 2012

Setting Squares for the Red and White

While I work on hand stitching the back of my Red and White Quilt as I go, I thought I would show how I made the Quarter Square triangle squares I used in the quilt.

I have used this method before, on a smaller scale, to make parts of Ohio Star blocks.  I thought it would work well to make the 12 inch squares to go between my pieced blocks.

Step 1.  I added 2 inches to the size block I need finished, at the end.  Since I wanted the blocks to be 12 inches when finished, I cut out 14 inch blocks.  Here you see one red and one white.  I drew a diagonal line across the squares, put them right sides together, and sewed 1/4 inch from BOTH SIDES of the line.
Step 1
Step 2. Cut on the diagonal.

Step 2
Step 3. You now have 2 squares that are made of two triangles - one red and one white.  Iron the seam allowances towards the red.

Step 3
4. Draw the diagonal on the wrong side of one of the blocks.  This should be the diagonal that crosses both colors. 
(GEOMETRY TEACHER ALERT!  Since a square is a rhombus, this diagonal will be perpendicular to the other diagonal - the seam you have already sewn.  Since a square is also a rectangle, the diagonals will be the same length.)

Step 4
Step 5.  (You can just barely see the line I drew in this picture on the white fabric)  Line up the squares with right sides together and opposite colors facing each other.  The red will touch the white.  You can FEEL that the seams line up since the seam allowances are ironed toward the red.

Step 5
Step 6.  Sew 1/4 inch from the diagonal you drew on each side of the diagonal.

Step 6
Step 7.  Cut through the diagonal.

Step 7
Step 8. TA DA!!!  You have two 13+ inch squares that are made of quarter square triangles!!  These are easily trimmed to the correct size.

Step 8
Since I used these in a Quilt-as-I-go method, I actually left them BIG and will cut them down later.  It gives me some fudge room as a quilt.  You might also be able to see that I used two different reds in this square.  After Step 3, I switched some of my squares around so different reds would be next to each other.

Here is a picture of the quilt when it was on my design wall.  (Yes, I know there is one setting square in the wrong position)  I have, since, pieced them all together and added a border.  I am currently hand finishing the seams on the back squares and should be done soon.  Then I will add a little more quilting in the borders, add the binding and be DONE....


...Done with my July project!!  And Done with Red.  I have used up most of my red stash in this project.  YEAH!!!

Stay tuned, however, because I hope to catch up and also finish my August project in August!!

Oh.. I am seeing red.
And white.
CathyH

Monday, July 23, 2012

Blue Argyle

Today I went to help a friend put together some rows in this Blue Argyle quilt.


There is a story behind this quilt...

One summer (I think it was two years ago) I went through my scraps and decided to cut the scraps into pieces that would eventually make quilts.  That is how I had the fabric ready for the Starburst Quilt last year.  


 I also cut a lot of blue squares and strips with the hope of making a Blue Argyle quilt sometime in the future.

One day a friend told me that she was thinking of making a quilt for one of the missionaries from our church - and that the missionary had said that blue was one of her favorite colors.

So... I pulled out my box containing the pre-cut quilt and asked if that would work.

My friend bagged up groups of blocks and distributed them to folks in our Quilting Bee. They returned the block with a cross sewn into the middle of the block.

I got the call that the rows were going together - and I went to help pin rows and iron squares.  We actually finished 4 other rows that are not yet attached..  Not many to go!

I think it's going to be beautiful!!!


More pictures to follow as we finish.
CathyH

Tuesday, July 10, 2012

UFO # 5 May

I have reached my May UFO goal: the top of this quilt:


A previous post described the planning process for this quilt.

My Mom used to make table runners.  The pattern she used had quite a bit of left-overs.  Each of these blocks represent a table runner my Mom had made.  She used to give them away as gifts and gave them to her church so they could sell them in their thrift store.


  I have a dear friend who used to sew with my Mom, even after Mom had moved into the Alzheimers Assisted Living facility. She helped Mom make DOZENS of the table runners. She just recently bought a quilting machine.  How fitting that she will be the one to quilt this beautiful Runner Quilt.

I'm linking this to Patchwork Times

2012 UFO CHALLENGE


CathyH


Sunday, June 17, 2012

Apron #3

I am revealing these aprons one-at-a-time.
I wanted to give them to the person as a gift before I show everybody in the world.


This apron is for a lovely friend who helps lead the Ladies' group at our church.  I want her to have an apron that reminds her of our last year of study in the book of Psalms.

I guess we all need the reminder to cry to the Lord daily and often. . . and we need the reminder that He will hear our voice.

I also had so much fun making pretty embroidered flowers.


Making these aprons was so much fun!


(Thanks, so much, to my friend for her service to God as she serves His people!)
CathyH

Tuesday, May 29, 2012

Apron #2


I started making these aprons (and some other little goodies I will show you later) to give as gifts.  I don't want to show you the specifics until the appropriate people have been gifted and surprised.

These are SO FUN to make!!  I make little quilts to use as pockets. I get to be CreATive in a small way AND finish some projects AND use up stash!!  I am having SO MUCH FUN!!

My Administrative Assistant for my math class is a faithful friend and makes my class run so smoothly. She is also an AMAZING cook.  So I made her a red gingham apron.  I fiddled with my stash and embroidery thread and came up with this:


Psalm 34 is one of my favorite Psalms - and The Lord is sweeter than anything we can cook in the kitchen.  Just a little reminder on an apron.
CathyH

Wednesday, March 28, 2012

Charming Triangles FINISHED

I have finished my Charm Quilt.


Each of the equilateral triangles are cut from a different fabric.  (Well, except that I am not perfect: only God is perfect.  I have found 2 pairs of triangles that may be from the same fabric).  There are 988 triangles on the front of this quilt and 14 triangles on the back - that makes 1002 triangles!!

Scraps of fabric - mind you.

Which I why I am entering this finished quilt in a Festival of Scrapiness  over at Stitched in Color.


I put the triangles into bigger triangles, and then into diamonds.


 When I started quilting the quilt, I intended to stitch on both sides of each seam.  That was quite a task with my little Singer sewing machine!!

But I am SO PLEASED with the results!!  Notice how it makes a pretty little star at every intersection of every triangle.


This is the back of the quilt - and you may be able to see that I used 8 different green fabric triangles and 6 brown triangles to frame the green


Here is some of the quilting detail on the back of the quilt.  I love the triangles and the stars!!


Here is a closer view of the front.  


Simply Charming!!

Check out the other folks who are participating in the Festival of Scrapiness:


CathyH