2 Sleeves = “house” shaped pieces
2 Shirt Fronts = 2 rectangles 5” by 12” with a small triangle cut off it
2 Collars = Looks like . . . a collar
2 Inserts = 2” by 5” triangles with smallest points cut off
1 Pocket = Looks like a pocket!
Sew the Sleeve
Make a French seam on the “underarm” seam of the sleeve by, first, folding the pattern in half, WRONG sides together.
Sew a scant 1/4” seam on both sleeves at the underarm seam.
Please backstitch when you begin and when you end.


Sew a scant 3/8” French seam on the under arm seam
(you are hiding the raw edges of the seam). Please backstitch as you begin and end.
2 Shirt Fronts = 2 rectangles 5” by 12” with a small triangle cut off it
2 Collars = Looks like . . . a collar
2 Inserts = 2” by 5” triangles with smallest points cut off
1 Pocket = Looks like a pocket!
Sew the Sleeve
 |
Sew a scant 1/4” seam on both sleeves at the underarm seam.
Please backstitch when you begin and when you end.
Turn the sleeve so the wrong side of the fabric is out, and press a crease at the seam you just made, folding the sleeve in half.


Sew a scant 3/8” French seam on the under arm seam
(you are hiding the raw edges of the seam). Please backstitch as you begin and end.
Turn right side out and press the whole sleeve in half, with the underarm French seam you made at the bottom fold.
Install the Collar
Place both Shirt Front pieces right side up, with the triangular cut outs at the top, center so it makes a “V” like at the top, front of a shirt.
Place the Collar right side up on the diagonal cut. Place the Collar about 1” from the center. Secure with a pin or two.
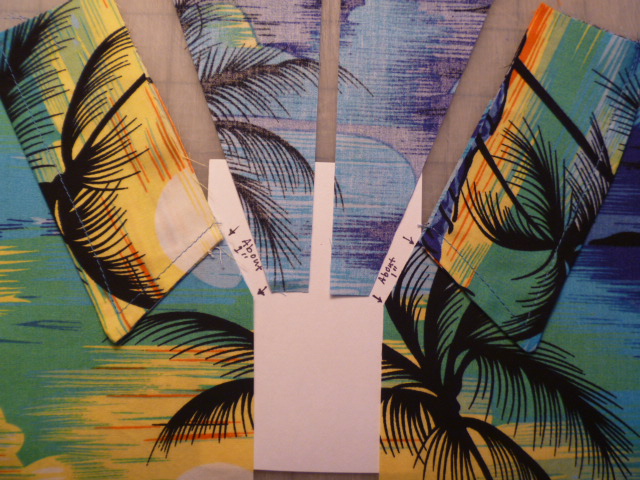


Fold the triangle over the collar and shirt and pin so you can sew a seam through all three layers:
A. the Shirt Front rectangle, right side up
B. the Collar, right side up and
C. the Insert, right side up.
These should all be lined up along that cut-off triangle on the shirt rectangle. The Triangle will be too big. That’s ok.

Mark where the shirt ends, top and bottom, with a pin so you can take a backstitch at the beginning and the end. (I stitched from the back side..) You may need to remove the pins previously used to hold the collar in place under the triangle. Stitch this seam through all three layers.


Turn to the right side of the pieces and now press the collar towards the shirt.

Trim the Insert so that the inserted triangle is part of one large rectangle that is one half of the shirt front.

Sew the Front, Middle, Seam
You now have two rectangles, each with a collar piece and an inserted triangle. Place them face to face, right sides together and secure with pins.

Attempt to make the collar seams match and make a “V”. Also take care to keep the seam allowances directed toward the shirt, not the Insert.

Sew a generous 1/4” seam. Be careful not to sew the collar points into this seam.
Press the seam open

Trim the Square
Trim the entire block to be 8-1/2” by 10-1/2” by trimming carefully as follows:
Trim to 4-1/4” from the center on the left.
Trim to 4-1/4” from the center on the right.
Trim the entire block to be 8-1/2” by 10-1/2” by trimming carefully as follows:
Trim to 4-1/4” from the center on the left.
Trim to 4-1/4” from the center on the right.

Trim any dog-ears or random tidbits from the top of the block and trim the bottom so that the block is 10-1/2” tall.

Make the Pocket
Fold the top of the pocket down 1/4” once, and then, 1/4” again. Topstitch across this edge, close to the fold.

Position the tag on the pocket 3/4” from the top of the pocket and centered left to right. Topstitch around the tag. Do not back stitch to start or stop, but pull the top threads through to the back and tie them in a knot with the bobbin threads. Trim the threads – being careful not to cut your knot.
Fold in the raw edges 1/4” all around the other three sides. Press. Topstitch the three sides to the shirt, centering it on the right half of the shirt about one inch below the collar.Do not back stitch to start or stop, but pull the top threads through to the back and tie them in a knot with the bobbin threads. Trim the threads – being careful not to cut your knot.
Position the sleeves near the top of the shirt, one on the right and one on the left in a way that looks appropriate. Be sure to place it around 1/2" below the top of the block. You will sew these into the seam with the right border and the left border.

Fold the sleeves onto the shirt as you have positioned them, being careful to keep them at least 1/2” from the top of the block.


Press seam allowances toward the shirt.
Take two more border strips that are 3-1/2” by 14-1/2” and sew one across the top and one across the bottom of the block. Take care with the collar to make it look like a real collar.
 collar tightly over the shirt at the seam where it is sewn, make a small pleat, a small wrinkle, to make it look 3 dimensional. You can sew this into the seam in the top border.
Fold in the raw edges 1/4” all around the other three sides. Press. Topstitch the three sides to the shirt, centering it on the right half of the shirt about one inch below the collar.Do not back stitch to start or stop, but pull the top threads through to the back and tie them in a knot with the bobbin threads. Trim the threads – being careful not to cut your knot.
Install the Borders and the Sleeves

Fold the sleeves onto the shirt as you have positioned them, being careful to keep them at least 1/2” from the top of the block.

Take two border strips that are 3-1/2” by 10-1/2” and sew one to the left side and one to the right side, being sure to catch the unfinished side of the sleeves in these seams.

Press seam allowances toward the shirt.
Take two more border strips that are 3-1/2” by 14-1/2” and sew one across the top and one across the bottom of the block. Take care with the collar to make it look like a real collar.
Instead of pulling the

Press seams towards the border.
Aloha!
CathyH


